Pilot 4 Learning Session Notes: Container Technology
Introduction
This guide contains technical details and practical explanations for the container technology at the core of the Pilot 4 project. While the Analysis Date Reviewers Guide (ADRG) contains specific instructions for setting up the necessary software and execution to launch the Shiny application included in the Pilot, the guide lacks background information on the key concepts behind container technology as well as advice for debugging issues if the execution procedures were not successful. The content in this guide serves as a companion to the Pilot 4 Learning Sessions with members of the Submissions Working Group held on August 1st and August 12th, 2025.
Visit the WSL and Docker Installation Guide for the recommended procedures to install Docker on a Windows computer.
Key Concepts
Definitions
The phrase Docker containers has become the common way to label the technology involved in this portion of the pilot. Before we go further, it is important to clearly define the key terminology:
Container: An object that bundles a piece of software (typically an application) along with the necessary system dependencies and libraries required to use the software. As for the kind of software a container can bundle, practically any type of software application that can run successfully in a Linux operating system environment can likely be bundled into a container. In practice, containers have been successfully leveraged to distribute software such as command-line utilities, web-based applications developed with a language such as R or Python, and complex software that integrates multiple components such as powerful server-side programs leveraging a database and custom APIs.
Container Image: A collection of instructions for creating a container, much like a blueprint or snapshot of what is offered in a container when it is actually run on a system. The instructions are technically composed of multiple layers (one can think of each layer as a specific step in the instructions to create the container).
Container Runtime: A software package equipped to manage and execute a container instance on the computer. Many types of container runtimes are available, but this pilot leverages the Docker Container Runtime which is considered a high-level runtime with a set of tools integrated together for making this process of running container instances easier for users which wraps low-level container runtimes. One can think of Docker playing the role of the R language to provide a high-level framework to perform statistical analysis and visualization (often wrapping C or Fortran code) without the user having to necessarily use those lower-level languages.
Much of the software we use day-to-day on our computers will have multiple versions available for the major operating systems: Windows, Mac OS, and Linux Distributions. However, a container runtime utilizes key features that are only available within the Linux kernel to provide ways the container instances are isolated from the main operating system and custom ways to allocate resources. The reason for including this information is that a high-level container runtime such as Docker is not able to be installed “natively” on the Windows operating system, as the Windows kernel does not support the necessary features. Instead, Docker can be installed on a virtualized Linux environment surfaced by the Windows Subsystem for Linux (referred to as WSL in the remainder of this guide).
Interacting with Containers
Once the Docker runtime is available on your system, you can verify that the installation was successful by running the following command:
docker run hello-worldThe result is shown in the demonstration below:
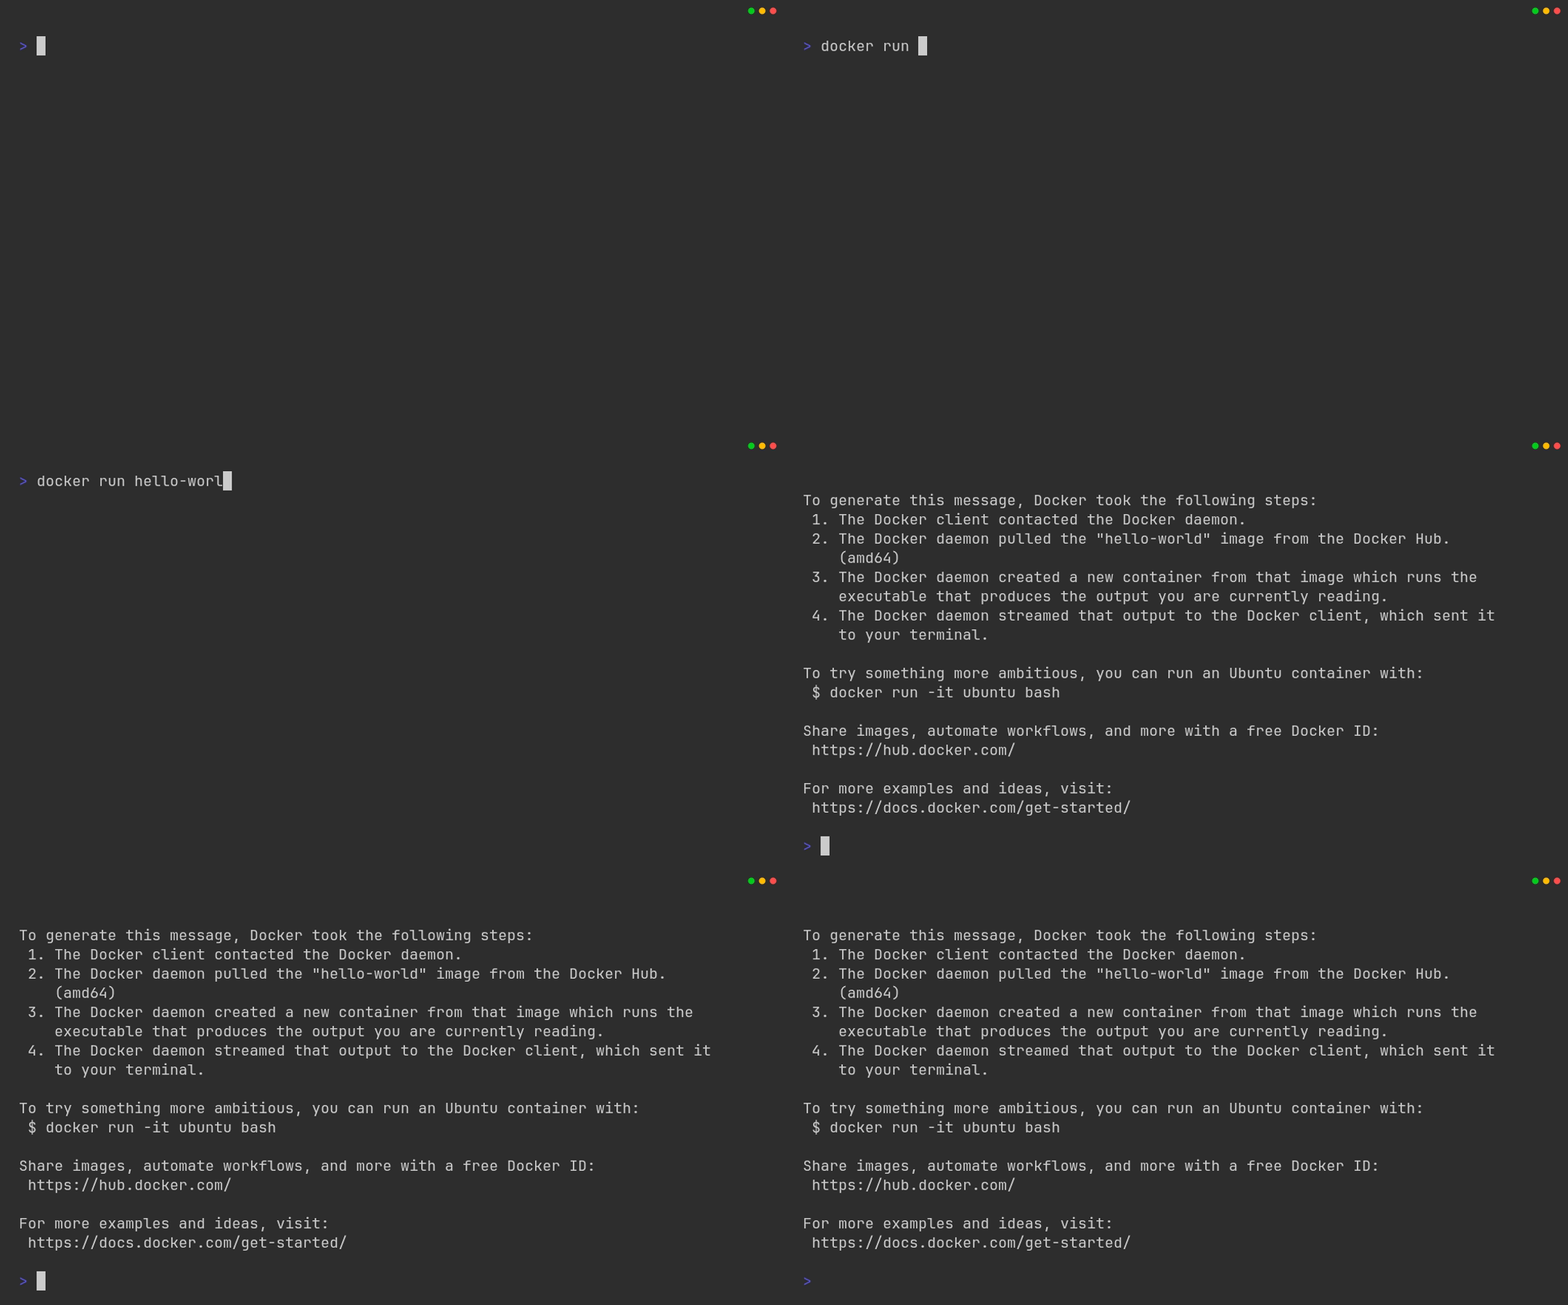
Here’s an explanation of this command:
- All commands involving Docker start with
docker. After this,runcreates a new container from the specified image, which in this case is thehello-worldimage.
It may appear that the hello-world image was built in to the Docker program, but it is actually stored in an online repository called Docker Hub. The docker run hello-world command first tries to determine if the specified image hello-world is already available locally on the computer. When it did not find the image locally, the next step is to download the image directly from Docker Hub. While Docker Hub is not the only container repository available, we use images from Docker Hub in this Pilot as the foundation for the Shiny application container.
In the previous example, the container executed simply printed a series of messages to the terminal and returned the command prompt back to normal. In certain situations (especially when the container is not performing as expected), it is helpful to be able to connect to the container process itself and run diagnostic commands. Unfortunately this hello-world image is too simplistic to demonstrate this. Instead we can run a new container based on the Ubuntu Linux distribution image and immediately enter a bash terminal:
docker run -it ubuntu bashHere’s an explanation of this new command:
-itis a flag telling the Docker container to create an interactive shell (i.e. command prompt) once the container is runningubuntuis the name of the container image, in this case the image is the official Ubuntu container image located on Docker Hub.bashis the name of the command we want to use that denotes the type of shell to launch, in this case the Ubuntu container image comes pre-bundled with the bash shell.
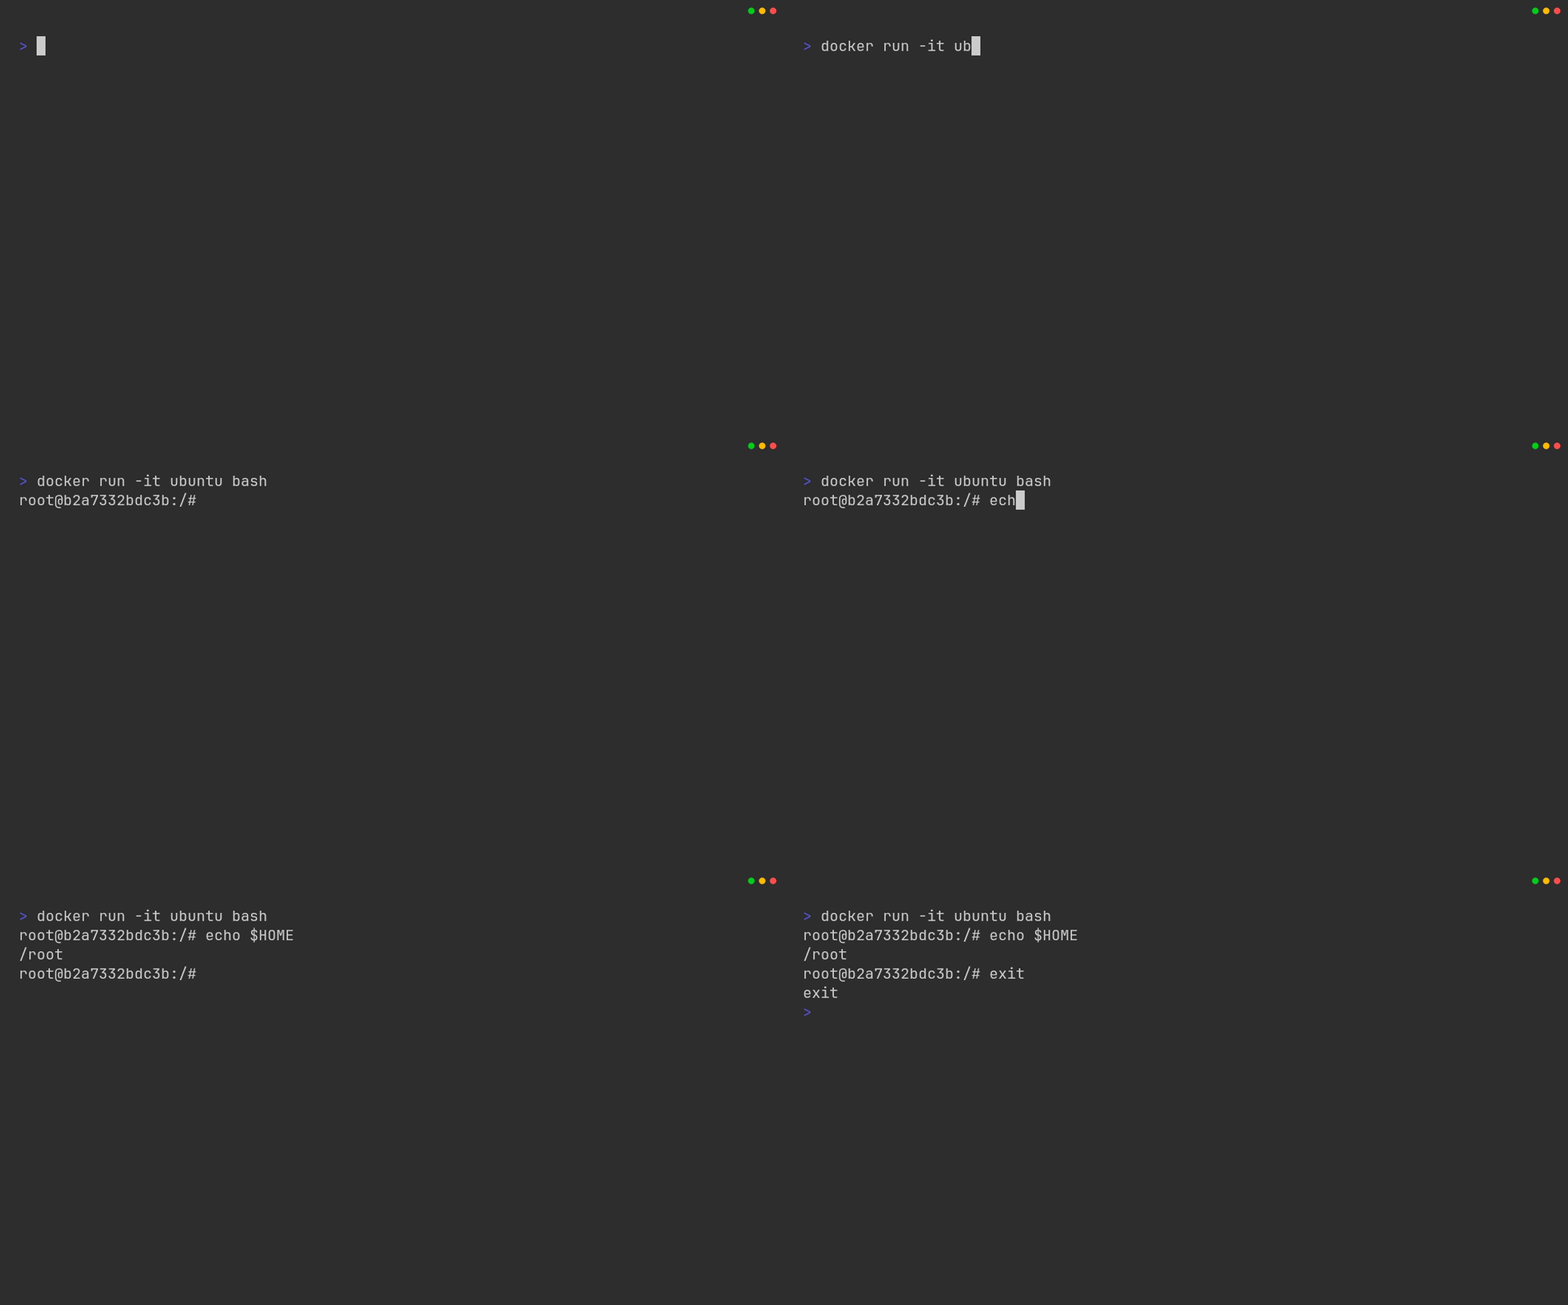
Notice in the container’s shell how the host name has changed. That is a clear indicator that the process is now being run in the container, and not the original terminal on the host system. Within this environment, any command supported by the container can be executed, without relying on the host system’s available programs. Once you are finished exploring the container shell, you can type exit to return back to the host system terminal.
Managing Containers and Images
The container runtime will obtain the appropriate container images from a repository (such as Docker obtaining container images from Docker Hub) and containers themselves will also be stored on the host system. In this section we will illustrate key commands for managing the available images and containers available on the system.
To view the available images on a host system, run docker images in the console:
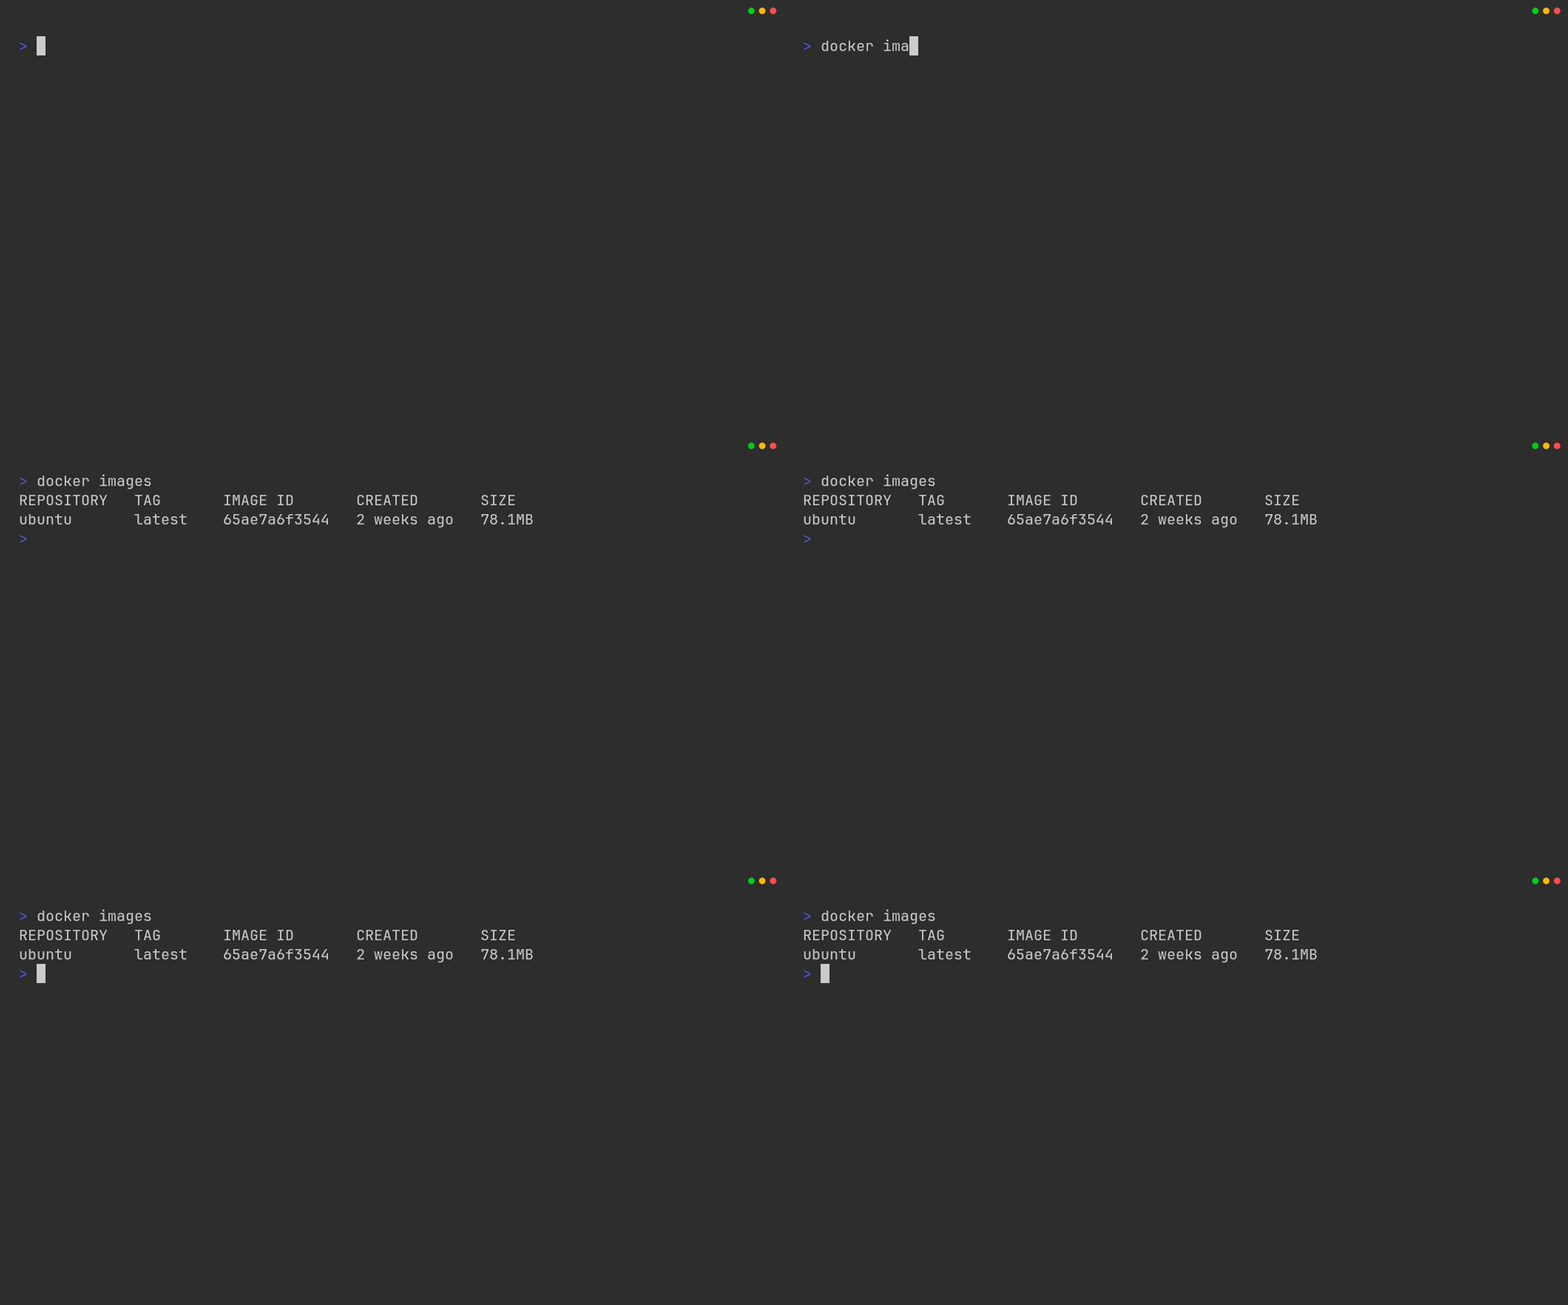
The result is a set of attributes for each container image:
- REPOSITORY: The name of the source repository from which the container image was obtained. When using the Docker runtime, any images downloaded from Docker Hub will have the “Docker Hub” portion omitted in the output. While the name of the repository says
ubuntu, it is technically the Docker Hub repository for Ubuntu, which can be viewed online at https://hub.docker.com/_/ubuntu. - TAG: The character string denoting the tag associated with the Docker image. Much like the Git version control system, Docker images support the concept of tagging a particular release of the image, which is helpful in the case of complex images that offer multiple types. By default, Docker will obtain container images with the
latesttag which means it is the most up-to-date release of the image on the repository. However, many projects offer tags as a way for you to specify a particular type. In the case of the Ubuntu container images, tags such as22.04,24.04, and25.10exist that correspond to the different formal releases of the Ubuntu Linux distribution. This will be important when we discuss the container images containing the R language later in this guide. - IMAGE ID: A unique string that identifies the image on your local installation. This string is a random-looking hash with similarity to the hashes assigned to a Git commit.
- CREATED: The time stamp corresponding to when the container image version was created in the repository.
- SIZE: The disk space used by the container image on the host system.
As for containers, you can list the containers running on the host system by running docker ps in the console:
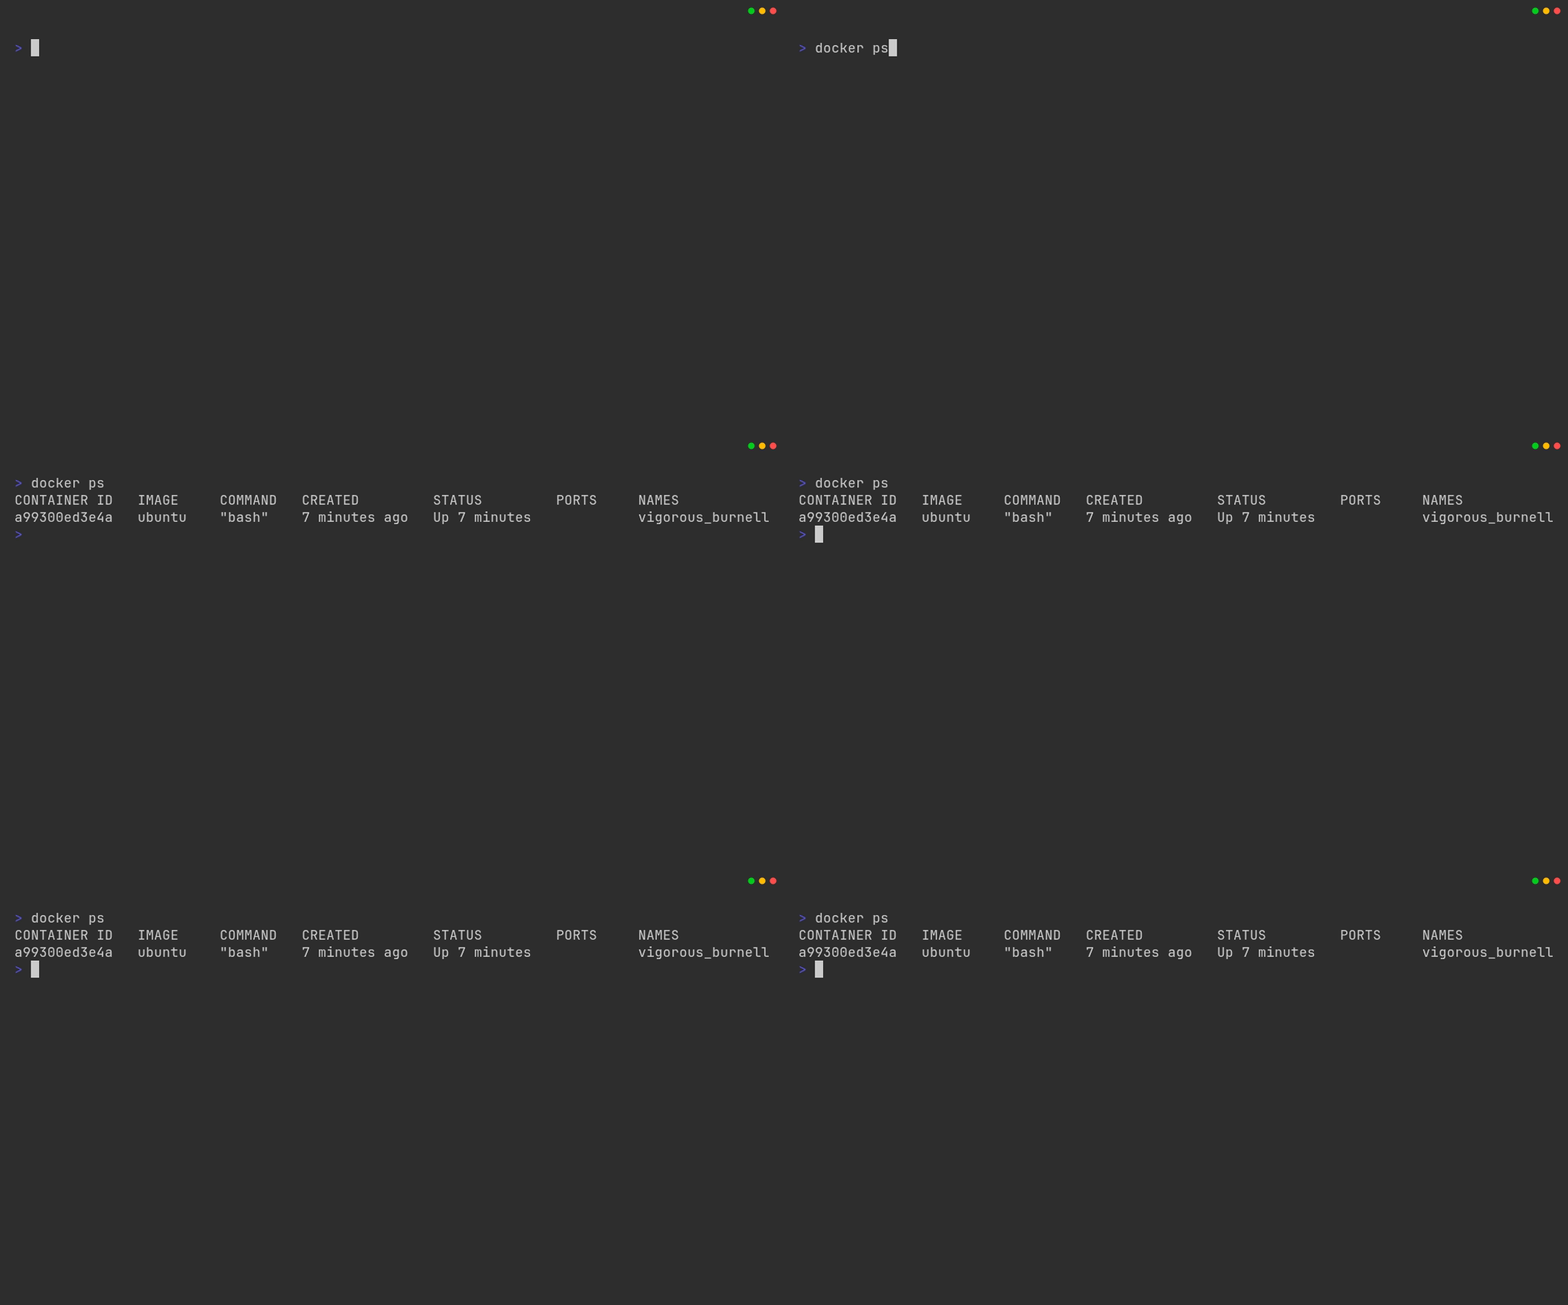
The result is a set of attributes for each container:
- CONTAINER_ID: A unique string that identifies the container on your local installation. This string is a random-looking hash with similarity to the hashes assigned to a Git commit, and it will always be unique for each container.
- IMAGE: Name of the container image used to launch the container.
- COMMAND: Name of the actual command that was executed when the container launched. In this example, we see that the
bashcommand is listed. - CREATED: The time stamp corresponding to when the container was created on the host system, which corresponds to when the
docker runcommand was executed for that container. - STATUS: Current status of the container. If the container is currently running, the status will be
Upwith the length of time it has been running. For any other containers that are not running, you will typically see a status ofExitedand the amount of time it has been stopped. - PORTS: If the container has mapped any ports from the container to the host machine, they will be listed here. This attribute will only be populated if the container run command involved defining these ports. The example process above is not a web-based application, hence no ports are specified. This will be important later in the guide when we illustrate a Docker container running a Shiny application.
- NAMES: The Docker runtime will assign a random character string with a more “readable” name to the container, often grabbing random words from the dictionary. This will be unique for each container running on the host system.
The example above was executed while at least one container was already running on the system. If we close/exit any running containers and then run docker ps, the output will be a blank. However that is slightly misleading. Even when a container is not running, it will very likely still be available on the host system. To display both running and stopped containers, run docker ps -a where -a is the flag to show all containers:
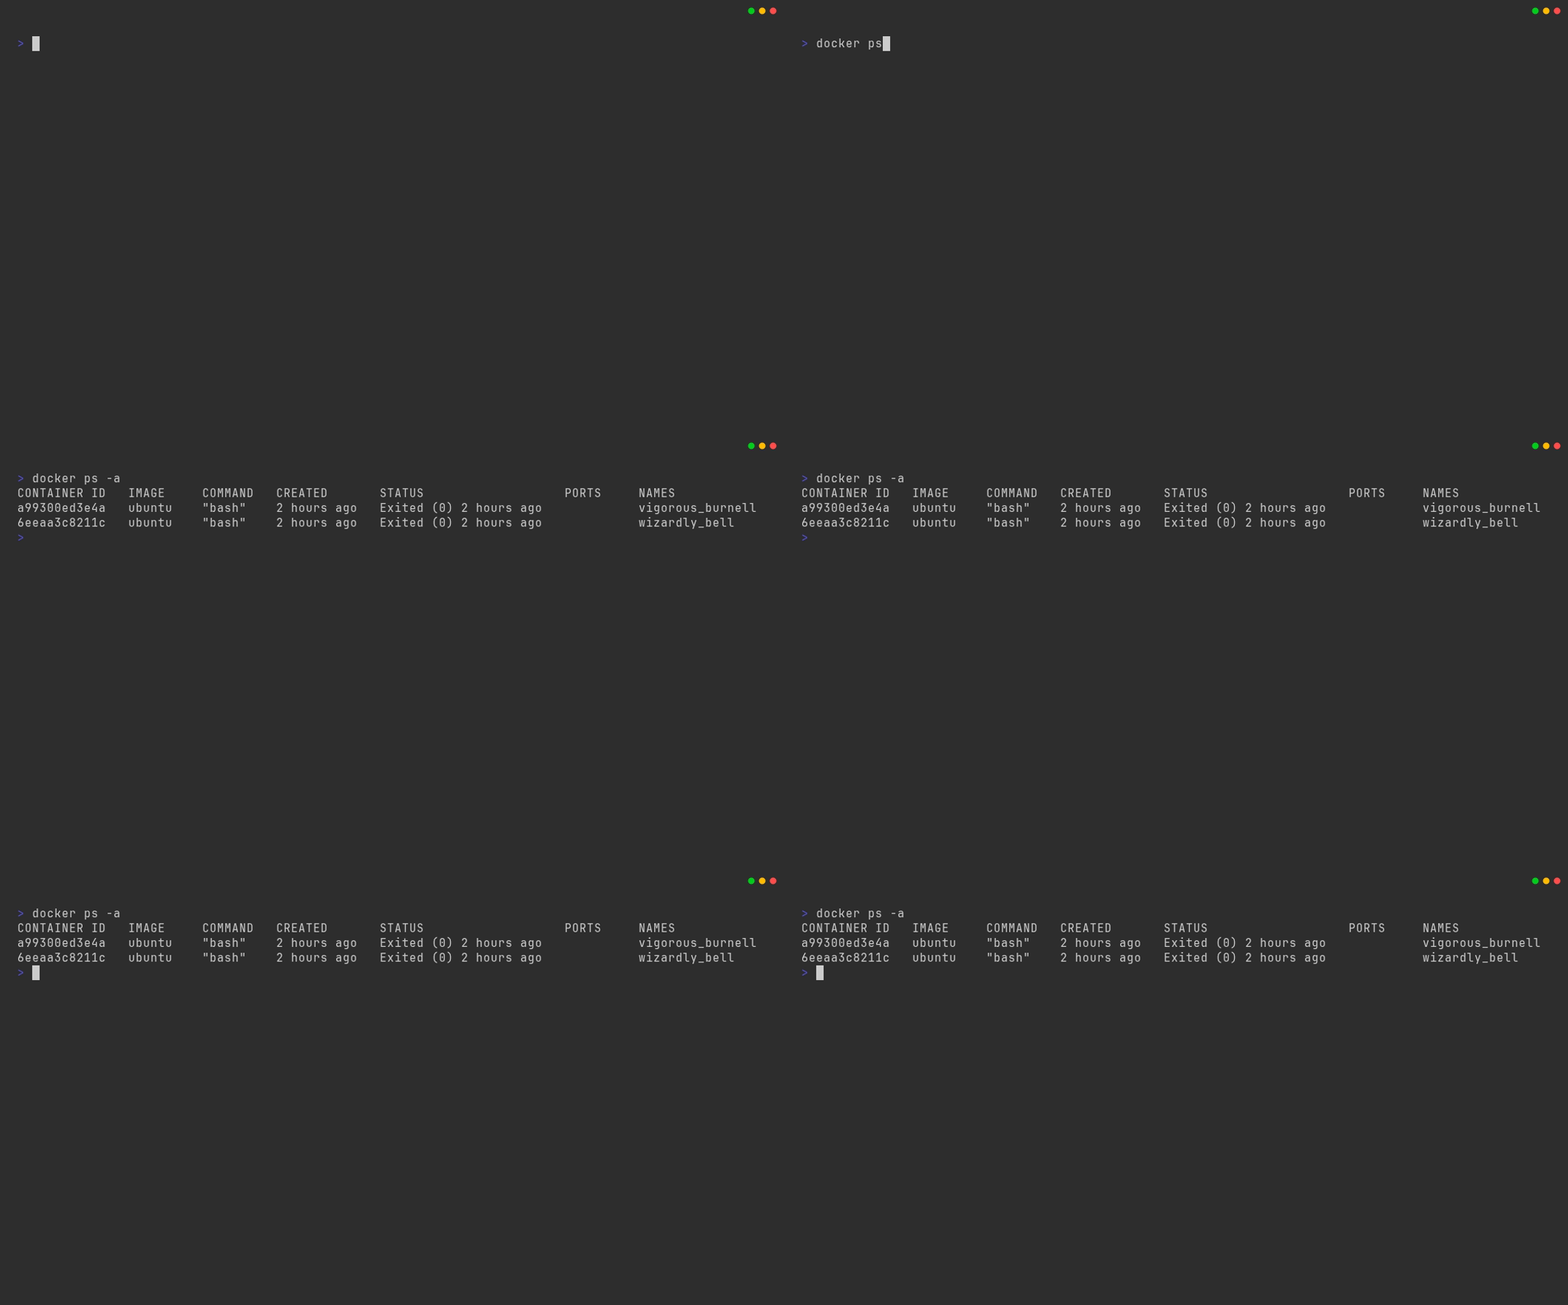
The containers listed in the example above show that indeed containers which have been stopped are still present on the host system. While in typical usage of Docker these stopped containers should not cause any issue, over time the number of containers present on a system can add up quickly. To remove a specific container from your system, use the command docker rm <id> where you use the actual container ID instead of the placeholder <id> in the example snippet. In the example above, we can remove the container with ID 6eeaa3c8211c using the following:
docker rm 6eeaa3c8211cThe output of the command is simply the container ID, confirming the container was indeed removed.
A logical question is how can we automatically remove a container when we exit, especially in the case of using a container interactively to debug an issue. The good news is we can add an additional parameter --rm to the docker run command, instructing Docker to remove the container immediately after the process stops. For example, the container we used to launch an interactive bash terminal can be automatically removed by using this command:
docker run --rm -it ubuntu bashMuch like containers, container images can also be removed by running docker rmi <id>, where you use the actual image ID instead of the placeholder <id> in the example snippet. Hence the Ubuntu container image we have used to launch the interactive container of the bash shell (with the ID 65ae7a6f3544) can be removed with the following:
docker rmi 65ae7a6f3544A common issue when running Docker is not being able to successfully delete a container image, even though any containers launched from that image have been stopped already. A necessary pre-requisite to deleting a container image is that no containers remain on the system that reference the image, even if they are stopped.
Building Container Images
Thus far, we have used container images that come directly from the Docker Hub repository. In practical use of containers, we often build upon existing images to include new dependencies and software to meet the goals of a project. There are multiple ways to build upon a container image, and we will illustrate a few of those now and see how they relate to Pilot 4:
Method 1: Interactive Commands
Imagine we want to extend the Ubuntu container image to include the R language. As mentioned earlier in the guide, containers are built upon Linux, and we will need to install R using the instructions for Ubuntu Linux. Adapting the instructions from the official R web site, here is a demonstration of installing R:
Launch a new container with the bash shell:
docker run --name ubuntu_container -it ubuntu bashUpdate the Ubuntu package manager
apt updateConfigure time zone (only necessary for Docker)
ln -sf /usr/share/zoneinfo/America/New_York /etc/localtime
echo America/New_York > /etc/timezone

apt install -y tzdata
Install necessary dependencies
apt install -y --no-install-recommends software-properties-common dirmngr wgetInstall the signing key for the official R package repository offered by the R Core team:
# add the signing key (by Michael Rutter) for these repos
# To verify key, run gpg --show-keys /etc/apt/trusted.gpg.d/cran_ubuntu_key.asc
# Fingerprint: E298A3A825C0D65DFD57CBB651716619E084DAB9
wget -qO- https://cloud.r-project.org/bin/linux/ubuntu/marutter_pubkey.asc | tee -a /etc/apt/trusted.gpg.d/cran_ubuntu_key.asc
Add the package repository to the available repository list
# add the repo from CRAN -- lsb_release adjusts to 'noble' or 'jammy' or ... as needed
add-apt-repository -y "deb https://cloud.r-project.org/bin/linux/ubuntu $(lsb_release -cs)-cran40/"
Install R base
apt install -y --no-install-recommends r-baseVerify R is available
RExit R
q(save = 'no')Exit container
exitFind our container image ID
docker ps -aSave our changes to a new container
docker commit <CONTAINER_ID> r-containerVerify new container image is present
docker imagesWhile the above procedure technically works, it has a few key drawbacks:
- All of the installation steps where typed in an interactive console, without any record of the steps themselves after exiting the container, other than the end result having R available.
- To reproduce this, someone would have to replicate the exact same process manually if they wish to build it themselves.
This workflow is akin to a data analysis using the R language in which all of the steps for data processing, analysis, and visualizations directly in the R console, without saving the commands and only retaining the relevant output. Much like how using R scripts with the programming code to perform an analysis, a similar paradigm exists for Docker in the form of the Dockerfile, the subject of the next approach.
Method 2: Dockerfile
A Dockerfile is a text file that contains the complete steps required to create a container image, akin to a recipe with details on the ingredients and actual cooking steps for baking a specific meal. An immediate advantage of using a Dockerfile to create a container image is the ability to document the actual commands necessary for the container image to perform the task, as well as being able to share these steps with others if they want to replicate the process. Using the example of installing R, here is an example Dockerfile with annotations describing key sections (you may download the file from the site’s GitHub repository)
1FROM ubuntu:latest

# update package manager
2RUN apt update

# Configure time zone (only necessary for Docker)
3RUN ln -sf /usr/share/zoneinfo/America/New_York /etc/localtime \
  && echo America/New_York > /etc/timezone

RUN apt install -y tzdata

# Install necessary dependencies
RUN apt install -y --no-install-recommends software-properties-common dirmngr wget

# Install the signing key
RUN wget -qO- https://cloud.r-project.org/bin/linux/ubuntu/marutter_pubkey.asc \
  | tee -a /etc/apt/trusted.gpg.d/cran_ubuntu_key.asc

RUN add-apt-repository -y "deb https://cloud.r-project.org/bin/linux/ubuntu $(lsb_release -cs)-cran40/"

# Install R base
RUN apt install -y --no-install-recommends r-base

# command to execute at container run time
4CMD ["R", "-e", "print('Hello World!')"]- 1
-
Define base image to serve as foundation for this image using the
FROMkeyword - 2
- All system-style commands must start with the RUN keyword.
- 3
-
While it would have been acceptable to have two separate
RUNlines for the two commands, it can be helpful to combine related commands by using the&&sequence and splitting a long line with\. - 4
-
At the end of a Dockerfile, it is common to include a default command to execute when launching a new container based on the image by using the
CMDkeyword. In this example, we launch R and print “Hello World!” via theprint()function.
With the Dockerfile ready, we can build the container using the following command (assuming the Dockerfile is in the working directory of the current terminal):
docker build -t r_container_from_file .-t r_container_from_fileassigns a custom namer_container_from_fileto the new container image we create.- The
.at the end of the command is a shorthand reference to theDockerfile. We could easily have specified the file nameDockerfileinstead of the., which is necessary if the file is named differently thanDockerfile.
Much like the Ubuntu container image example, if we want to instead launch an interactive shell using this new container image we can adapt the previous command:
docker run --rm -it r_container_from_file bashWithin this session, the bash shell will be launched instead of the R command we set in the Dockerfile. This is an important technique especially for debugging the R installation interactively.
Pilot 4 Container Information
With a solid foundation of the important concepts and methods to administer containers, we can take a closer look at how Pilot 4 uses containers to assembly an execution environment for the Shiny application.
Base Container Image: Rocker
In previous examples we demonstrated a proof-of-concept for installing the R language in a container image based on the Ubuntu container image. As container technology started to become popular in the realm of data science, the Rocker project emerged to provide robust containers built specifically for R users. The project offers a variety of container images tailored for different use cases in the form of tags. The Pilot 4 team chose the Rocker project container images called r_ver which bring the following advantages:
- Ability to use a specific version of R from source (meaning is it compiled directly in the image), not the version offered by default in the Ubuntu Linux distribution package manager.
- Many system dependencies come pre-installed which certain R packages require for compilation.
Building the Pilot 4 Container Image
To ensure reproducibility and the ability for the reviewer to create the container image on their system, a Dockerfile was included in the Pilot 4 submission bundle. Below is an annotated copy of the Dockerfile, which was named Dockerfile.txt in the bundle to meet the eCTD acceptable file types.
1ARG R_VERSION=4.2.0
ARG IMAGE_REGISTRY=docker.io
ARG IMAGE_ORG=rocker

2FROM $IMAGE_REGISTRY/$IMAGE_ORG/r-ver:$R_VERSION

LABEL org.opencontainers.image.licenses="GPL-3.0-or-later" \
      org.opencontainers.image.source="https://github.com/RConsortium/submissions-pilot4-container" \
      org.opencontainers.image.vendors="RConsortium, Appsilon" \
3      org.opencontainers.image.authors="Eric Nantz <theRcast@gmail.com>, André Veríssimo <andre.verissimo@appsilon.com>, Vedha Viyash <vedha@appsilon.com>"

4RUN apt-get update --quiet \
   && apt-get install \
     curl \
     libssl-dev \
     libcurl4-openssl-dev \
     libxml2-dev -y --quiet \
     libfontconfig1-dev \
     libharfbuzz-dev libfribidi-dev \
     libfreetype6-dev libpng-dev libtiff5-dev libjpeg-dev \
   && apt-get autoremove -y --quiet \
   && apt-get clean --quiet \
   && rm -rf /var/lib/apt/lists/*

5RUN useradd -m shiny

USER shiny

6ARG LOCAL_APP_DIR=./submissions-pilot2
ARG LOCAL_DATA_DIR=./datasets
ARG APP_DIR=/home/shiny/submissions-pilot2
ARG DATA_DIR=/home/shiny/submissions-pilot2/datasets

COPY $LOCAL_APP_DIR $APP_DIR
COPY $LOCAL_DATA_DIR $DATA_DIR

7WORKDIR $APP_DIR

# Prevents RENV from mistakenly download from teal.* remotes (as the dependencies are
#  already defined in renv.lock).
8RUN Rscript \
  -e "options(\"renv.config.install.remotes\" = FALSE)" \
  -e "renv::restore()"

9CMD ["R", "-e", "options(shiny.port = 8787, shiny.host = '0.0.0.0'); pkgload::load_all(export_all = FALSE,helpers = FALSE,attach_testthat = FALSE);options('golem.app.prod' = TRUE); pilot2wrappers::run_app()"]- 1
-
Docker supports optional arguments (parameters) when building the container. The
ARGkeyword distinguishes these parameters with the ability to set a default value, similar to how an R function can have default parameter values. - 2
-
The
IMAGE_REGISTRYparameter defaults todocker.io, short for Docker Hub. Note that values of the variables derived from the above arguments will populate this statement to beFROM docker.io/rocker/r-ver:4.2.0meaning we are using the Docker image calledr_verwith tag4.2.0, meaning we are using R version4.2.0. - 3
-
While not mandatory, the
LABELkeyword allows for optional metadata to be attached to the container image - 4
- By using the Docker container image from the Rocker project, R is already available. However these statements ensure that we have the necessary system dependencies installed for R packages utilized in the Pilot Shiny application.
- 5
- By default, containers are built and run as the root user in the container. A best practice is to create a non-root user for a container this is not requiring complicated system administrative tasks.
- 6
-
Additional arguments are specified to define the location of the Pilot 2 Shiny application source files and associated XPT data files on the host system. The default values of
LOCAL_APP_DIRandLOCAL_DATA_DIRare directories within the current working directory of the Dockerfile. TheAPP_DIRandDATA_DIRdirectories correspond to the locations these files will be copied to within the container using theCOPYlines immediately below. - 7
-
The
WORKDIRkeyword ensures that the working directory for the remaining steps in the Dockerfile are executed with the working directory changed to the application directory denoted byAPP_DIRinside the container. - 8
-
Since the Pilot 2 Shiny application R package dependencies were managed with the renv package, this step performs the package library restoration from the associated
renv.lockfile. - 9
-
The default command to be executed during launch of a new a container based on this image is to run the Shiny application in the same manner as what was performed in the Pilot 2 Shiny application execution instructions. Note that the port specified is
8787and the host is specified as0.0.0.0which will be utilized in the container execution command.
Using the docker build command, we can build this custom container image using the following:
docker build \
  --build-arg LOCAL_DATA_DIR=datasets \
  --build-arg LOCAL_APP_DIR=pilot2wrappers \
  -t submissions-pilot4-container:latest \
-f Dockerfile.txt - Note the use of
build-argstatements, ensuring that we specify the values ofLOCAL_DATA_DIRandLOCAL_APP_DIRto use the directory namesdatasetsandpilot2wrappers, respectively. - We set a custom name of the container as
submissions-pilot4-container:latest. While it is not required to use this specific format, the:latestallows us to set a custom tag for the particular build. This can be helpful if we need to create alternative builds with a different tag while keeping a default version available. -f Dockerfile.txtensures Docker usesDockerfile.txtto perform the build, since we are not using the default name ofDockerfilefor the file.
While in the testing performed on custom virtual machines and other Windows installations the container for this application was built successfully, there is always a chance that a build fails. If that occurs, a recommend workflow to troubleshoot is the following:
- Create a new copy of
Dockerfile.txtwhich removes and/or comments out various steps in the build process, for exampleDockerfile_test.txt. - Modify the
CMDline at the end of the container to becomeCMD ["R", "-e", "print('Hello World!')"] - Build a new container based on this updated image:
docker build \
  --build-arg LOCAL_DATA_DIR=datasets \
  --build-arg LOCAL_APP_DIR=pilot2wrappers \
  -t submissions-pilot4-container:test \
-f Dockerfile_test.txt - Create a new container based on this debugging image that launches a bash shell:
docker run --rm -it submissions-pilot4-container:test bash- Launch R from the bash shell and manually try the steps that failed in the R process.
Running the Pilot 4 Shiny Application
Assuming the container build was completed successfully, we can launch a new container based on the custom image with the following:
docker run -it --rm -p 8787:8787 submissions-pilot4-container:latest-p 8787:8787ensures that the container port 8787 is mapped to the host system port 8787
Once the container is launched, the R process will execute the R code that was specified in the CMD line at the end of Dockerfile.txt. Once the process reaches the step of running the Shiny application, open a new web browser on your local system using the following address: 127.0.0.1:8787.